Sunday, August 1, 2021

Sound Wall | Science of Reading

Sound Wall - Science of Reading | Apples to Applique
 

I've been busy making the shift to the science of reading this summer, from prepping task cards with Elkonin boxes to adapting sight word resources to align with the heart words strategy. I knew there was one more resource I needed to prepare before the new school year started: a sound wall! The science of reading suggests that sound walls are more useful to students than word walls, as students reference the phonemes and corresponding graphemes.

There are various sound walls out there, but my favorites have real photographs of people articulating sounds. It was important to me that my sound wall have these photographs, and that these photographs feature diverse people.


Sound Wall - Science of Reading | Apples to Applique

The included grapheme cards also include photographs of familiar objects for each sound, to assist students in using the wall as a reference for their reading and writing.

Sound Wall - Science of Reading | Apples to Applique

These pictures show the completed vowel and consonant displays with all of the grapheme cards, but I wouldn't recommend starting the display with all of the cards; it would be far too overwhelming for students. Build the display a little at a time as you introduce the phonemes and graphemes to your class. This will familiarize them with the display and better enable them to use it in a meaningful manner.

I hope you are as excited as I am to implement more researched-based reading instruction in your  classroom! You can get a copy of this sound wall here in my store or here in my TPT shop.

Keep teaching with heart and passion!


Tuesday, July 6, 2021

Shifting from Sight Words to Heart Words


Shifting from Sight Words to Heart Words | Apples to Applique
I mentioned in my last post that I am taking time this summer to really delve into the science of reading, making plans to adapt my instruction this fall to better reflect what research shows about how children learn to read. 

One big shift when aligning instruction with the science of reading is in the area of sight words or high frequency words. Many of us have been told that these words are not decodable and that students simply need to memorize them, leading to well-intentioned drilling with flash cards, fun activities like rainbow writing, and other strategies that are only quasi-helpful. These things work fine for higher learners, but they typically leave struggling readers floundering.

Enter heart words! This shift is based on the premise that the majority of high frequency words are, actually, largely decodable. For example, the words and, big, in and many others are completely decodable, following phonics rules without any deviation. Students can simply apply letter-sound correspondence to decode these words, which takes so much pressure off of kids trying to memorize these words in isolation.

Many other high frequency words, such as have and said, are largely decodable, as most of the letters actually follow the letter-sound rules that students have already been taught. This means that they only have to really memorize the irregular part of the word, which significantly cuts down on the memorization students have to do, and simultaneously helps them learn to rely on the letter-sound correspondence they have learned.

Shifting from Sight Words to Heart Words | Apples to Applique

For example, analyzing the word said, there are 3 phonemes: /s/, /e/, /d/. The /s/ and /d/ are both easily decodable, as they are represented by the letters s and d, respectfully, just as students have been taught. That means there is only one phoneme left for students to memorize, which is the /e/. In the word said, the /e/ is represented by the letters ai; as this does not follow any phonics rule, it is marked with a heart. These letters are the ones students need to learn by heart, hence the term "heart words".

The good news is that shifting from the idea of sight words to heart words is easy! You can use whatever sight word list you are already using or is required by your district. My district uses Fry's, and I am required to keep track of how many sight words each student knows each quarter. I have an entire system I designed for use in my classroom which helps students track their own progress and facilitates communication with families. I believe it is a good system, but I knew the implementation needed updated to reflect science of reading principles.

Shifting from Sight Words to Heart Words | Apples to Applique
 

Adapting instruction is simple! The system is already set up to send home a sheet of flash cards with students at their individual paces. Now, I will utilize small group time to have students mark the heart words on their flash cards before sending them home. I could mark the words myself before making copies, but I want the students to mark the letters themselves as we discuss it to help them cement that knowledge. 

Shifting from Sight Words to Heart Words | Apples to Applique


Another component of my classroom system is having students check out a class set of flash cards; on these, which are laminated, I will have students mark them with dry erase markers. Again, this will be completed during small group time so that I can oversee the process and we can analyze the phonemes and graphemes together.

I hope this inspires you to make the shift away from drilling sight words to using heart words in your classroom; it's a simple move with a big payoff for your students!

If you are interested in my whole class sight word system, which has been updated to include tips on heart words and a parent letter about heart words, you can find it here in my store or here on TPT.

Keep teaching with heart and passion!


Thursday, July 1, 2021

Phonemic Awareness Task Cards with Elkonin Boxes

Note: This post contains affiliate links. If you make a purchase after clicking on my  links, I receive a small commission at no cost to you! Thanks for your support!


I spend so much of every summer learning and planning for the next year, reflecting on what has gone well and where I have room for improvement. While I try to improve in lots of areas, I usually pick one area to focus on more intently. Last year, my focus was on small groups, which was greatly aided by this small group system.

This year, I am focused on improving reading instruction and have been learning about the science of reading. It is fascinating stuff, and it is astounding how many of the things we were taught as teachers do not actually align with how research shows children learn to read. As I learn, I am working on creating and updating resources to better reflect these principles--after all, when we know better, we do better. 

These photo storage boxes are just the right size for these task cards!
 

One of the products I've revamped is my phonemic awareness task cards. The idea of phonemic awareness is one with which I was already familiar, and something I have long implemented in my classroom. I was glad (read: relieved) to hear teaching phonemic awareness is aligned with the science of reading. The touch points I have been using with my students, one per sound, are exactly in line with the phonemic awareness principles of SOR. 


While the basic premise of the task cards remains the same, the update now includes Elkonin boxes on the back of each card with the answer. This seemingly small change makes a world of difference in helping students associate the sounds in the word with the graphemes representing those sounds.


Each set of phonics cards still has a fun tracking system, where students earn pictures to place on their scene as they master each new skill. This mastery focus is also aligned with the science of reading, as each student moves at his or her own pace and does not move forward until he or she is ready.

I hope these task cards are helpful for you and your learners! You can find individual skills here in my store, or buy the bundle here to save!

Keep teaching with knowledge and passion!

Tuesday, June 8, 2021

Selling on TPT 101: Listing Your First Item

Selling on TPT 101: Listing Your First Item | Apples to Applique

Welcome to TPT 101: Part 10, the final installment. (Click on these links to find Part 1, Part 2, Part 3, Part 4, Part 5, Part 6, Part 7, Part 8, and Part 9).

It's the moment you've been waiting for! Time to go live with your first resource!

When you list your product, you'll have to put in a product title and description. Do not try to make your product title something cute and catchy. Think of what a teacher might search to find your product, something like "sight word activities", and go from that. Keep it simple and searchable; keep the cutesy names for your cover image. 

The description should give an overview of your resource, what's included, and how it will make a teacher's life easier or address a classroom need. Work some keywords into the description naturally, especially in the first few lines. Do NOT keyword stuff, meaning, do not put a list of related keywords into your description. That can actually hurt you in the search results, as TPT says their algorithms penalize keyword stuffing by putting those listings further down in the list of results.

Along this same line, avoid adding to your title or description in the hopes of getting extra sales. For example, during the holiday season, don't just add the word "Christmas" to your titles and descriptions unless they are actually Christmas-specific products. It's a shady practice and buyers see through it, plus it muddies the search results for people actually searching for Christmas activities.

You will probably want to add your terms of use to your description so that buyers know any restrictions before they purchase.

Before you can list your product, you will also need to select keywords, product types, and grade levels from TPT's menus. This helps buyers to find relevant products.

This sounds like a lot to do for every product every time, doesn't it? Well, thankfully, I've got a trick to help make this process faster. Once you list that first product, you can use it as a starting point for future products. On the TPT site, click on your name, then "My Product Listings" in the drop-down menu. When your list of products comes up, you will see each one has an option underneath labeled "Quick Edit". Select that, and then scroll down to "Create a Similar Listing". This will essentially copy the listing, allowing you to change anything you need without having to retype all of the tedious parts each time. Just make sure you change all of the product files and thumbnails!

Once you have written your description and uploaded your product file, preview file, and cover and thumbnail images, YOU ARE FINISHED! Click that publish button and wait for sales to start coming in!

Congratulations on becoming a TPT Author! I wish you and your store all the greatest success!

Keep teaching (and creating) with heart and passion!

Sunday, June 6, 2021

Selling on TPT 101: Product Previews

Selling on TPT 101: Product Previews | Apples to Applique

Welcome to TPT 101: Part 9! (Click on these links to find Part 1, Part 2, Part 3, Part 4, Part 5, Part 6, Part 7, and Part 8).

You've made it to the final step before listing your product: creating a preview! A preview differs from thumbnails in that it gives buyers a more in-depth look at your product. 

Often, sellers choose to show their entire product in the preview; I typically do this for most of my resources unless the product is too large. This helps buyers know exactly what they are getting and prevents any surprises. I know I hesitate to purchase products for use in my own classroom if I can't see enough of it to know whether it will meet the needs of my students.

When sellers hear recommendations to show their entire product, they often get nervous about their work getting stolen. Why would people pay for something they can get for free? This is a valid concern, but there are steps to take to safeguard against this. First of all, watermark your products. I put "©Apples to Applique" multiple times across the page in large, semi-transparent text. If you're using AdobePro to flatten and secure your products, the watermark step is easily added into this process. AdobePro also gives the option to not allow printing, which is what I select for my previews. 

If you take those two steps, there is little reason to fear people will steal your resources. Most people are not going to take the time to copy your product when they can just spend a few dollars to purchase it. Not to mention it is difficult to replicate clip art, fonts, and design. 

Of course, there is always an exception or two. For example, I wouldn't recommend showing your entire resource if it is something like a reading passage that a buyer could conceivably use without having to print the product. Otherwise, show off your hard work! Resources with good previews generate more sales than resources without them.

We are almost to the end of TPT 101! Just one more post to come, all about finally listing that product!

Keep teaching (and creating) with heart and passion!


Friday, June 4, 2021

Selling on TPT 101: Making Catchy Covers and Using Thumbnails

Selling on TPT 101: Covers and Thumbnails | Apples to AppliqueWelcome to TPT 101: Part 8! We're getting ready to wrap up the series; only two more posts after this one. (Click on these links to find Part 1, Part 2, Part 3, Part 4, Part 5, Part 6, and Part 7). 
 
So, you've created your unique, quality product, made sure you followed copyright and trademark guidelines, flattened and secured your work--time to finally list it, right?!
 
Not quite yet, but you're getting close! Now you need to make covers and thumbnails for your product. 
 
Your cover is the image that will show up in search results and be prominent when someone clicks on your product. The thumbnails are the three other images buyers can click on when perusing your product.

Here's an example of a cover image from one of my latest products.


The space TPT gives you for covers and thumbnails is square, so I recommend making your images square, as well, to use all of the space and also give the impression you are familiar with the platform and care enough to make your products look neat. I create in PowerPoint and simply make my slide size square, add in my elements, then save the slides as JPG images. There are other programs you can use to create, too; many sellers like Canva. Anything that works for you and allows commercial use is fine.

When making your covers, don't try to show everything; that's what your preview is for (we'll talk about previews in Part 9). Just show enough to catch the eye and pique buyers' interest. There are millions of products on TPT, you want yours to stand out! Use big text and minimal information.

I have found that I have the best results when I use photographs (when possible), so I highly recommend it. Shots of your resource in action can help buyers visualize the product in their own classroom and showcase how awesome your resource is. However, when utilizing photos, do NOT show students or their work! (That's a huge FERPA violation, not to mention a poor ethical decision to use your time in the classroom to work on commercial endeavors. All TPT work should occur off the clock). Most in-action photos you see are staged, with sellers completing any "work" themselves. I've even been known to write with my left hand on a paper to make it look more childlike--whatever works! Sellers also frequently use their own children to stage photographs.

Thumbnails from the same product I showed above

After your cover, create your three thumbnails. These are your advertising space! Highlight what makes your product unique and valuable. Again, don't try to show everything! Just pick a few important things you want your buyers to know. The rest will be in your product description and preview.

Once you create your cover and thumbnails, you are only one step away from being able to list your product! Keep an aye out for TPT 101: Part 9, coming soon!

Keep teaching (and creating) with heart and passion!

Wednesday, June 2, 2021

School Year in Review: Faves and Flops

Note: This post contains affiliate links. If you make a purchase after clicking on my  links, I receive a small commission at no cost to you! Thanks for your support!

Classroom Faves and Flops | Apples to Applique

This abnormal school year is finally drawing to a close. Though it has been shorter in duration (we started a month later than usual, as did many other districts), it has felt longer with the extra strain of teaching during a pandemic. I was blessed to be fully in-person for most of the year, with the exception of the month between Thanksgiving and Christmas, during which we were remote, but that was not without its challenges. Keeping 6-year-olds distanced and wearing masks, making sure everyone was frequently washing hands, the revolving door of students in quarantine, the lack of in-person connection with parents, the absence of fun traditions like field trips, etc.--it has all taken its toll. As usual, I am sad to tell my students goodbye, but I am more than ready for a break.

Looking back on this crazy year, I thought it would be fun to highlight some of my favorite things, and some things I tried that didn't work out as well. Teaching is an art, and, as with any other art form, you are constantly learning and honing your skill.


Classroom Faves and Flops | Apples to Applique
 

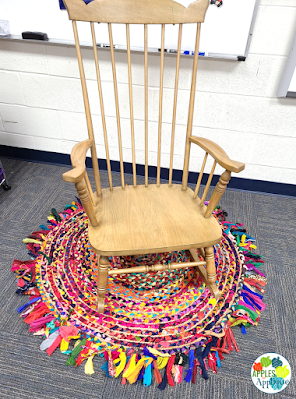
Fave: This adorable rug

My littles love to scooch close to me on the carpet and I am constantly afraid of rocking over their little fingers. I also am a person who gets overwhelmed by too much sensory input, like touching, and sometimes need some space from the little hands that want to constantly be patting or tugging at me. I realized that a rug would provide a perfect visual boundary, as well as being cute. It matches my colorful decor well and, being an inexpensive rag rug, I'm not too worried about it getting torn up. I love the happy pop of color it provides, and it has worked quite well to define my space for my students.

Classroom Faves and Flops | Apples to Applique
They do *not* still look this cute after a year of use!

Flop: Individual student lap desks

Oh, they looked so cute on Pinterest, and as we were being told we had to keep kids spaced apart all day, the collaborative tables I usually use were not an option. Individual desks were low in supply in my district, with everyone wanting them, and it didn't seem age appropriate to ask first graders to sit at them all day. This seemed like such a good option!

At first, I loved it, and my kids loved it. But as time went on, I realized the desks were a pain. They were so lightweight that they got kicked/knocked over easily, they moved about too freely on the carpet, and they became a catch-all for all the little things that 6-year-olds treasure (read: stuff that should be thrown away). They also were not as sturdy as I had hoped, and it didn't take long for many of them to crack. Surprisingly, many of my students started requesting to sit at the couple of traditional desks I had left in the room. As I had already suspected in years prior, the kids do better with occasional movement, and going from desk to floor sitting throughout the day provides that.

I'm looking forward to ditching the individual desks and returning to collaborative tables next year, but hey, I tried something new!


Classroom Faves and Flops | Apples to Applique

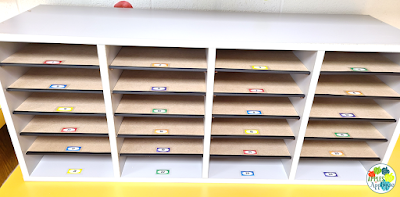
Fave: This student mailbox system

This helped so much with organization and made it possible for me to only send home papers once a week, as opposed to every day, without having them piled on my desk or having the kids shove them in their cubbies. It was a little pricey, but it was worth it to me to get the wooden version as opposed to the cardboard versions. It also took a bit of time to put together, but I am so glad I took that time.

Classroom Faves and Flops | Apples to Applique
 

Flop: Yoga mats for students 

These seemed like a great idea to accompany the lap desks. However, it didn't take long for little pieces of the foam to start flaking off. I even had a couple of students cut slits in the sides of them with safety scissors, so they just weren't durable enough for daily classroom use. They also became a tripping hazard, and cleaning and rolling them up each day became quite the chore. This flexible seating option gets a hard "no" from me.


Classroom Faves and Flops | Apples to Applique

Fave: This small group system

I love, love, love this thing! It makes it so easy to change groups around and to organize materials--provided they are worksheet-type activities. My only complaint is that it's not convenient to organize small group activities such as games, which I tend to utilize a lot in my classroom. On those days, I put a note in the file folder that lists/explains the day's activity and then put the activity materials in a color-coordinated tub. Problem solved! This system makes things really easy for subs, paras, and anyone else who may be coming in to work with small groups.


Classroom Faves and Flops | Apples to Applique

Flop: This headphones organizer

You guys, I really wanted to love this. It seemed like such a great organizational solution! I even created an editable headphones organizer that I listed in my TPT store. This may be fine for older grades, but most of my kids were too short to reach the top row or two. The bottom of the organizer was already at the floor, so I couldn't lower it anymore. The weight of all of the headphones (plus the kids yanking on it trying to get headphones out from higher rows) proved to be too much for the Command hooks holding it on the wall, too, so I was having to frequently rehang it. All in all, I decided it was easier for the kids to keep their headphones in the baskets in their cubbies.

Well, there's my list of faves and flops for the 2020-2021 school year. I would love to hear your own faves and flops!

Until next time, keep teaching with heart and passion!

Wednesday, May 19, 2021

Selling on TPT 101: Flattening and Securing

Selling on TPT 101: Flattening and Securing Your Work | Apples to Applique

Welcome to TPT 101: Part 7! (Click on these links to find Part 1, Part 2, Part 3, Part 4, Part 5, and Part 6).

Today we're going to talk briefly about the need to flatten and secure the products you've created before listing them for sale. Flattening and securing protects your work and the work of any other creators, such as clip artists, whose work you've included in your product; it prevents anything from being lifted or copied from your resource.

There are a few different ways you can do this, but first, let's address a common misconception: Merely saving as a pdf does NOT flatten or secure your product! Many people are unaware of this and assume that once they hit that "save as pdf" option, they are good to go. Unfortunately, it is more complicated than that, but it is an important step that can't be overlooked. In fact, if you use commercial clip art, it is nearly always part of the artist's terms of use that their art must be flattened.

Here are the top 3 ways to flatten:

1. Save each of your pages/slides as an image, and then compile the images together in a new file. This takes time, but prevents you having to purchase any additional software. If you are using PowerPoint to create, make sure you Google how to change the dpi of your output so your images don't end up blurry.

2. Flatten with Adobe Pro. (This is my preferred method). You can flatten your images and text, password protect your file, and add certain security features. For instance, on my preview files, I change the settings so that printing is not allowed. Again, do some Google searches or watch some tutorials on how to flatten with Adobe. I suggest doing a couple of trial runs and then testing to see whether you can copy and paste from the file, just to make sure you have done it correctly. It's not difficult, but it will take a few times to memorize the steps and settings.

3. Buy a software specifically designed for flattening. Many TPT sellers use a product called Flatpack and swear by it. I haven't personally used it since I haven't seen the need with having AdobePro, but it is an option for you to look into.

Whichever option you choose, the important thing is that you take the time to complete this step with every resource.

Stay tuned for Part 8, where we will talk about creating previews for your product.

Until then, keep teaching with heart and passion!

Thursday, April 22, 2021

Selling on TPT 101: Terms of Use and Credits

Selling on TPT 101: Credits and Terms of Use | Apples to Applique

Hi, friends! Welcome to TPT 101: Part 6! (Click on these links to find Part 1, Part 2, Part 3, Part 4, and Part 5!)

Today, we're going to talk about an important part of product creation that can seem a little tedious: crediting artists whose work you've used and creating your own terms of use.

Most clip artists require a link back to their store when you use their art. Typically, they will include their logo as an image file with any clip art you have purchased. The best way to credit them in your product is by including a page in your file that acknowledges them. I put something along the lines of "Clip art and fonts by these talented artists", followed by images of their logos. Then, I link each of their logos to their respective stores. This can be done easily in PowerPoint by right-clicking on the logo and then clicking on "link". Then you simply insert the link to that store. Of course, you will want to double-check the terms of use of each artist, but for most of them, this process meets the criteria.

Speaking of terms of use, you will want to create your own for your products. Personally, I include this at the bottom of my credits page with my copyright information, but some sellers put it as a separate page. It doesn't really matter how you choose to do it, as long as it is included and easy for your buyers to find and understand. 

To create your terms of use, think of what you want to allow with the purchase of your product. Most sellers include some wording about not using the product for commercial use and prohibiting the redistribution to other teachers, indicating that the sale is for a single classroom. Here is the wording I use, which you are welcome to use yourself or adjust to meet your needs: 

"©[Year] Amber Hock, M.Ed., Apples to Applique. All rights reserved. Purchase of this unit entitles the purchaser to reproduce the pages in limited quantity for one classroom use only. Resource may not be uploaded to the internet. Duplication for an entire school, district, or commercial use is prohibited without written permission from the publisher."

Creating your credits and terms of use is one of the less-fun aspects of creating, but is so important! The good news is that, once you have created it, you can easily copy and adapt it for future products.

I hope you're getting more comfortable with the idea of creating and listing your products! Stay tuned for Part 7, where we'll discuss how to flatten and secure your products to prevent elements from being lifted and stolen.

Until then, keep working on bringing your ideas to life, and keep teaching with heart and passion!


Sunday, April 4, 2021

Selling on TPT 101: Copyright and Trademark

Selling on TPT 101: Copyright and Trademark | Apples to Applique
Disclaimer: I am not a lawyer, and this is not official legal advice. For specific questions, contact a lawyer who specializes in copyright law.

Welcome to TPT 101: Part 5! (Click on these links to find Part 1, Part 2, Part 3, and Part 4!

When I have talked to other teachers about the possibility of selling on Teachers Pay Teachers, many of them are hesitant because they are afraid of unintentionally breaking copyright law. I understand that fear; it is a legitimate concern, and something to learn about before you dive into creating resources. I am by no means an expert on all things copyright or trademark, and this is NOT legal advice, but I wanted to pass along some things that I have learned over the last 6 years of creating.

1. Many things are copyrighted or trademarked that you would not assume, and you cannot use these terms/characters/images without express permission from the owner. That means you cannot use them at all. You cannot refer to them in your title, description, or product. This includes specific curriculum!

2. Websites like Trademarkia are your friend. If you are unsure about a brand or term, type it into their search bar and see if there is a live trademark on it.

3. Don't trust what you see other TPT sellers doing. You will find thousands of copyright violations on Teachers Pay Teachers. Sadly, TPT does not vet their products and will only take products down if they receive a cease and desist letter. I believe this takes away from the legitimacy of the site as a whole, but they claim they cannot take on this responsibility. It is up to us as sellers to ensure the quality of the site by taking extra care that our resources do not violate copyright and trademark; this helps all of us by enabling buyers to trust that our resources are ethical and legitimate.

Again, just because you see something on TPT does not mean it is not a violation of copyright. Some sellers have gone through the proper channels to receive permission, others are simply innocently unaware, and, disappointingly, some have decided it is worth the risk. I am here to tell you it is not; some companies do frequently go through the site and issue cease and desist letters and TPT can offer refunds on all of those sales, which come out of your earnings. The company can also take legal and financial action against you, so just don't go there. It isn't worth it!

4. Always do your own research and do not blindly trust secondhand research from others, but a good rule of thumb is to avoid common characters and brand names. Use generic terms in place of brand names. Just avoid referring to children's characters all together; these companies simply do not grant permission for their use by entrepreneurs, so don't even waste your time trying. 

I actually have a personal anecdote on this one that also serves as a warning: when I was first starting on TPT, I purchased some clip art featuring some popular children's book characters which stated it was for commercial use. I thought I was in the clear, but I was not. The clip artist had merely saved images from an internet search, packaged them together, and resold them. Of course the seller didn't care if they were used for commercial purposes; they didn't have the rights to them in the first place! Thankfully I realized the error before that particular company did a sweep of TPT (which they do frequently) and I deleted the products. But had I done more research on copyright and trademark, I would have avoided the situation in the first place.

5. Try not to be discouraged by this post! I do not want to scare you away from creating products! Just make sure your work is your original creation and that any clip art you purchase is the original work of the seller. Most clip artists do only sell their own work, and as long as they are not a replication of a familiar character, and they state that you are allowed to use their work commercially, you should be good to go!

Stay tuned for Part 6, in which we will discuss writing your own terms of use and properly crediting artists whose work you've used in your products.

Until then, keep teaching (and creating!) with heart and passion!


Friday, March 12, 2021

Selling on TPT 101: Product Creation - Tips and Tricks for Making Resources


Selling on TPT 101: Product Creation | Apples to Applique

Hello, and welcome to TPT 101, Part 4! (Click on these links to find Part 1, Part 2, and Part 3).

Let's talk about the most fun part of selling on Teachers Pay Teachers: Product creation!

Creating products at first can seem overwhelming. I promise it gets easier as you go along, and today I want to share with you some tricks I've learned that have made creation faster and easier, as well as more professional.

Personally, I love PowerPoint for creating products, so most of these tips will be specific to PowerPoint, but many can also be used for your program of choice.

First, if you are making printables, set your slide size to 8.5" x 11" (or A4 if you are not in the United States). This will ensure smooth printing for your buyers. I also, personally, like to start with a blank background rather than one of the PowerPoint templates.

Next, just start putting in your text and graphics! Play around with inserting images and text; PowerPoint makes it very easy to resize and rearrange items. It takes time to improve your skills in design, so just take some time to play around with different fonts, color palettes, layouts, etc. Do keep in mind, though, that for printable products, it is best to offer them in black and white, when possible. Many teachers do not have access to colored printers, or that access is limited. Many sellers choose to put both a colored and a black-and-white version in the file so teachers can choose what meets their needs.

Here are some of my favorite PowerPoint shortcuts that make the creation process easier:

To move an image/ text in front of or behind another object, right-click on it and select "send forward" or "send backward".

You can select an object and have it align exactly with the edge of your page or of another object by using the align tool. If only one item is selected, it will align with the page edge. If two or more items are selected, it will move one to match the location of the other. For example, if you click "align top", it will automatically move the lowest object to be in line with the top object.

You can select multiple items at a time using the control key (PC) or the command key (Mac) and selecting them. When they are all selected, you can click on the shape or picture format option at the top to do some handy things. You can group them together so they move as one object. You can resize them together so the proportion remains the same. You can use the align tool to line them all up together or space them out evenly.

Another great trick for lining up text or images is by using tables. You can insert tables with whatever number of cells, rows, or columns you wish. When you click "insert table", you select the number of rows and columns. I believe it caps out in the creation pane at 10 by 8, but after you insert the table, if you need more, you can simply right-click on a cell and choose to add another row or column. Using a table is a fast and easy way to put cutting borders on flash cards, or to ensure text is spaced exactly right. You can leave the borders black or make them invisible, depending on whether or not you want them to show in the final product.

You can easily save slides or pages as an image to be used on covers or thumbnails, or for marketing purposes. Simply click "save as" and then select "jpg" from the drop-down menu under the file type.

Sometimes, you might want to save a picture of a group of images or an element on your page, but not the entire page, for many different reasons, really. Perhaps to use it on a thumbnail or because you need to crop the picture but had it placed at an angle on the page, or for any other number of reasons. To do this, click on any images/text boxes, etc. that are part of what you want to save, right-click, and select "save as picture". It will export just those pieces to a png file which can then be used as needed.

Copy and paste is your friend. You can duplicate entire slides or just parts of them and then change them as needed. This is super helpful when you want to keep the same background, headings, and borders on multiple pages but change some of the other elements. You can copy and paste images to make them all a uniform size. One of my favorite features about copying and pasting in PowerPoint is that if you copy an element on one page--say, for example, you decided to add a header after you've already made several pages--when you paste the element on a different page, it aligns it in the same place. This is a huge time saver for things like going back and adding a copyright to each page.

To easily offer a color and black-and-white version of your product, use the copy and paste tools. Create one version of your page (I like to start with the colored version) and then duplicate the page. Right-click on the clip art and select "change picture". Then you can easily switch out the colored clip art for the black-and-white version of the clip art and it will be the correct size and in the right place.

Whew, that was a lot of information thrown at you all at once! Experience is the best teacher, so open up PowerPoint (or your preferred program) and play around with it. You'll be amazed at the things you can do quickly and easily once you start using all of the tricks available to you.

Until next time, keep teaching (and creating) with heart and passion!


Tuesday, March 2, 2021

Selling on TPT 101: Generating Ideas and Making Unique Products

Selling on TPT 101: Generating Ideas and Making Unique Products | Apples to Applique
Hi, friends! Welcome to Part 3 of Selling on TPT 101. If you missed them or need a refresher, you can find Part 1 here and Part 2 here.

We've covered setting up your shop and making sure before you start creating that you have commercial rights to elements you are using. Today, we're going to talk about coming up with ideas and creating unique content.

Sometimes the hardest part is generating ideas; there are millions of resources on Teachers Pay Teachers, and it can feel like everything has already been made. However, try not to let that discourage you! There is still a place for your resources, especially with your unique spin. No one has your exact perspective.

In searching for ideas, make sure to take care with where your inspiration comes from. It can be tempting to make a version of some cool thing you found on Pinterest/TPT/your favorite teaching blog, but directly copying someone's work is a definite no-no. Using others' ideas as inspiration is a little more of a gray area. If you take an idea and change it significantly to make it a unique product with your own touches, you are probably in the clear. If you're just remaking it and switching out a few elements here and there, it may be technically legal, but it's not ethical.

Personally, I try to avoid searching on TPT for other products when I have an idea, because I don't want to subconsciously get ideas and copy someone else. However, it happens frequently that sellers inadvertently make a product that is similar to someone else's; after all, teachers have similar needs and are going to think of similar ideas. If you create something and then find something similar on TPT, don't panic. You will see there are thousands of similar products on TPT; most of these people have not copied one another, but are just using tried-and-true activities and formulas. Not searching beforehand increases the likelihood that your product will not look like a carbon copy of others out there.

Speaking of those thousands of similar products, here's my other piece of advice when it comes to making unique products: Don't waste your time making products for areas that are super-saturated. I don't mean a certain niche, I'm talking about specific product types. For example, there are thousands  of alphabet clip cards out there, both on TPT and on blogs. Scroll through Pinterest and you can find hundreds of them for free. There's little point in taking the time to create something that your buyers can find in hundreds of other places for free; your time is better spent creating something new.

The best inspiration comes from things you find yourself wanting in the classroom. You may consider keeping a little list of ideas as these things come along. Think of what would make your life easier as a teacher, and of novel approaches to reach your students in a different way. That is what other teachers are searching for, too. 
 
Stay tuned for Part 4, where we'll start talking product creation!
Until then, keep teaching with heart and passion!


Wednesday, February 17, 2021

Selling on TPT 101: The Basics

Selling on TPT 101: The Basics | Apples to Applique 
Welcome to Part 2 of TPT 101! If you missed Part 1, you can find it here! 
 
Today, we'll be covering the boring nitty-gritty stuff regarding fonts, clip art, and commercial use. This is the part that gets really overwhelming and confusing for people, but it is super important.
 
Disclaimer: I am not a lawyer and this is not legal advice. For questions, please contact an attorney who specializes in copyright.

To put things simply: You cannot just use any font, clip art, or photo for anything you want. If you are listing products in your TPT store, you must have a commercial use license for any elements you used. Yes, even if you are listing a product for free.

Fonts
Just because a font is installed on your computer doesn't mean you can use it commercially!
You can find many free commercial-use fonts on sights such as 1001 Fonts, Font Squirrel, and others. Note: Not all fonts on these types of sites are for commercial-use; make sure to check the terms of use for each one. 
You can also find many reasonably-priced fonts on Teachers Pay Teachers. Some sellers allow you to download the font for free for personal use so you can test it out, and then require a small, one-time fee to use it commercially.

Clip Art
Just like with fonts, you must have the rights to use any clip art commercially. Do not just do a Google search and take images from there! 
I get most of my clip art from TPT because those sellers understand the platform and how the images will be used. They also have the types of images teachers need for common lessons, topics, and themes.
Clip art can be quite the investment! I recommend starting with what you can find for free. There is a decent selection of clip art available on Teachers Pay Teachers that is free for commercial use.

Photos
Photos follow the same guidelines as clip art, but can get very expensive through the main stock photo sites. You can find images that are in the public domain and are free for commercial use; sites like Pixabay also have free photographs that can be used in your products.
Take caution of any photos showing people! The company from which you are purchasing should have signed model releases on file. (As a side note in this same vein, do NOT use photos of students in any  of your products or marketing!)
 
While the odds may be small that you are ever found out or reported if you use fonts or clip art for which you do not have commercial rights, it is simply not worth the gamble. First and foremost, there's the importance of building a business on integrity. I want to set a good example for my children and students and put out good into the world by doing the right thing. Secondly, if you are found to be violating trademark or copyright, TPT issues a strike against your store and you can face financial ramifications. So take care to do things the right way and it will pay off in the end.

We will end there for today; if you are excited to get started, you may want to start searching around for fun fonts and graphics that can be used in your future resources. Practice looking for terms of use (often shortened TOU) to see what the artist allows.

Look for Part 3 coming soon!
Keep teaching (and creating!) with heart and passion!


Saturday, February 13, 2021

So, You Want to Sell on Teachers Pay Teachers? TPT 101: Getting Started

TPT 101: Getting Started | Apples to Applique
When other teachers hear that I sell resources on Teachers Pay Teachers, they often express that they would love to do the same, but they don't know where to start. I understand; when I started 6 years ago, I had an item I decided to upload on a whim, but when I actually logged in to the TPT website, I was immediately overwhelmed. I had to come up with a store name? And a logo? And answer a bazillion questions, put in a product description, create thumbnails--and my first product had to be free? Seriously, I had thought I could just upload my file and go on my merry way. I almost logged out right then and there. 

I'm glad I didn't. When I uploaded that first file, I never dreamed that TPT would be heavily supplementing my income in just a few short years. It has been such a blessing to me and my family that I want to share the things I've learned along the way in hopes of sparing newer sellers some of the mistakes I made.

I am going to be releasing these tips as a series of free blog posts. Today, we're just going to hit a few things you'll want to get out of the way before you upload that first resource.

1. The Name Game

This is, arguably, one of the hardest parts. It can seem like all the good names are taken. Some sellers opt to use their own name, which makes it easy and almost guarantees no other seller will be using that name, but you have to consider the amount of anonymity you wish to keep. If you are teaching, be aware that some districts can legally own anything you create for your job, so you may wish to keep everything related to your TPT store completely separate.

Do a search on TPT and Google to see if your desired name, or something similar, is already taken. You don't want there to be any confusion between your store and others.

Do not use trademarked or copyrighted terms. (We'll have a whole post about that later, don't worry!). For example, you should not use the brand name "Crayola" in your store name, because you don't have the rights to it. Yes, "Crayola Creations" sounds cute and it's alliterated, etc.--don't do it. (Keep in mind--just because you see another seller do this does NOT mean it's okay; more on that in a future post).

Don't stress too much about making your store name reflect your niche, especially as you probably don't even fully know what your niche is at this point. Personally, I would recommend not boxing yourself in too much with your name. When I started my store, I taught Pre-K Unified (special ed and general ed in the same room). Since then, I have started teaching first grade and, therefore, expanded my market. I'm glad I didn't choose a name with "Pre-K" in the title.

Make it unique! Your store name doesn't have to necessarily reflect something school related. My store name is Apples to Applique. I've debated before on changing it because applique doesn't have anything to do with school, but it is personal to me. The name stemmed from my two greatest passions outside of my family: teaching and sewing. It reflects who I am, and I never have to worry about another seller having my name! Think of well-known companies that have strange names: Etsy, Google, Amazon--you get the idea. None of those reflect what they are or what they sell, yet that hasn't stopped their success.


2. Creating a Logo

This is not really a necessity to get started, but I highly recommend it. Would you rather purchase something from a new store that had an attractive and professional logo, or a new store that had a "placeholder" of sorts--or, worse yet, just the gray image indicating that they hadn't uploaded a logo of any kind? 

Some sellers choose to use a picture of themselves in lieu of a logo; they often argue it makes their store seem more personable, as buyers realize there is a person behind the business. I'm sure that is a valid point; personally, I feel that a logo looks more professional and I would rather not have my face on all of my products, but you choose whatever feels right to you. You will find big, successful sellers on both sides of this, so it is not going to make or break your store.

If you decide to go with a logo, you can find other sellers on TPT or find artists on sites like Fiverr who will design logos for you for a minimal fee. If you're designing it yourself, keep in mind that you must use a commercial-use font and, if you use clip art, you want to be sure the artist allows for it to be used in logos (not all commercial-use clip art may be used in this way). If using clip art, another consideration is that you want your logo to be unique; you don't really want the clip art in your logo also being used in other people's products, so having something designed specifically for your store is probably the best route.

One last reminder: Logos can be changed! Get something you like, but don't stress too much. Stores rebrand all the time, and you can, too, if  you decide in the future that you want to update your look.


3. That Scary First Product

TPT requires your first product to be free. I found this a little frustrating when I opened my store, because I didn't want to give away the product I had intended to list, so that meant I was scrambling to come up with a second product right away.

Here are a couple of things to keep in mind with that first product:

Keep it simple, yet a good representation of your work. When I listed mine, I just randomly threw together something quick and easy to "check the box", if you will. You can totally go that route, but since you know about it ahead of time, you can be more strategic about it. Giving away a sample of a larger product is a great approach; for example, if you have alphabet handwriting pages, you could list just pages A-E for free, with the hope that people will love it and then purchase the complete product.

This product can be changed later! I created a series of number talks and decided to make a free sample so teachers could try it and decide if it would be a good fit for their classroom. I opted to make this my primary free item because it is a better representation of my work than my original free item.

Keep it short. TPT recommends that free items not be more than 10 pages, and, as a general rule, I agree! (My number talks sample is the only one I have that is larger than that, and that is because I wanted teachers to get a sample of each included number talk, which was greater than 10). If you offer too much for free or at too cheap of a price, your buyers will not see the need to purchase your other items at regular price. You know those stores that have really frequent sales or 50% off coupons, so much so that you never pay regular price for anything? You don't want that for your store.


I feel like I have probably overwhelmed you with information, so we will stop here for today. Take a breath and just let these thoughts ruminate for a bit. Start thinking about your name, logo, and free product so that you are not overwhelmed with those things when you go to open your store. If you come up with a great name, go ahead and start your TPT seller account with that name! You might also open a free Gmail account with your store name; it adds another layer of separation between your personal life and your store, and provides a great avenue for buyers to contact you as needed.

In the next post, we will start getting into the nitty-gritty of product creation, but I thought it best to start here so you can be prepared with all of these "extras" when you are ready to list your first product.

Until next time, keep teaching (and creating) with heart and passion!


Sunday, January 24, 2021

The Last Teacher Planner You'll Ever Need

Note: This post contains affiliate links. If you make a purchase after clicking on my  links, I receive a small commission at no cost to you! Thanks for your support!

The Last Teacher Planner You'll Ever Need | Apples to Applique

UPDATE 02/2021: This is now also available in a darling boho rainbow theme!

Getting organized and keeping track of all the little things is one of the biggest struggles of teaching, amIright? There are just so many things, multiplied by so many kids...it can make your head swim. It takes a while to figure out a system that works for you.


The Last Teacher Planner You'll Ever Need | Apples to Applique

I have tried out several different teacher planners throughout my career, and I have never found one that is just right. Some have too many things I'll never use, so I'm lugging around a 300-page book, of which I use about 50 pages. Others don't include enough, so I end up using 3 other notebooks along with it. Finally, I decided to design my own planner, my Goldilocks-just-right planner. (Sorry, when you teach early childhood, you relate things to fairy tales). 

The Last Teacher Planner You'll Ever Need | Apples to Applique

Well, you guys, I think I've done it. This planner has it all: schedules, student info, parent communication, calendars, planners, staff meeting notes, professional development notes, assessment trackers, and more. It even has an entire section for special education, with IEP goals, dates, data tracking, and individual schedules.

The Last Teacher Planner You'll Ever Need | Apples to Applique
 

My favorite part: you can print and use only what you need. If you don't teach special education, just don't print that section. No sense in having pages in your planner that you don't need! If you need extra lesson planning pages, just print more! You can also easily add to it throughout the year, so there's no worries if you end up changing your mind about how to organize things midway through the year. (Please tell me I'm not the only one who does this!)

The best part: the planner is undated, so you can use it year after year. Just reprint whatever pages you need and write in the new information as needed.

The Last Teacher Planner You'll Ever Need | Apples to Applique
 

The file is in PowerPoint, and while the elements themselves cannot be edited due to copyright, you can overlay text boxes to add text, like putting your name on the cover.

The Last Teacher Planner You'll Ever Need | Apples to Applique

The file includes two sizes: a standard 8.5" x 11", and a 9" size that is compatible with the Happy Planner punch. I love how it looks with cute binder discs, but you could always just use a standard 3-hole punch and a binder.

I hope this planner helps save you time by having all of your essential information in one place, so that you can spend more time on the important things and less time shuffling through papers. 

Find it here in my store, or here in my TPT shop.

Keep teaching with heart and passion!