Tuesday, June 8, 2021

Selling on TPT 101: Listing Your First Item

Selling on TPT 101: Listing Your First Item | Apples to Applique

Welcome to TPT 101: Part 10, the final installment. (Click on these links to find Part 1, Part 2, Part 3, Part 4, Part 5, Part 6, Part 7, Part 8, and Part 9).

It's the moment you've been waiting for! Time to go live with your first resource!

When you list your product, you'll have to put in a product title and description. Do not try to make your product title something cute and catchy. Think of what a teacher might search to find your product, something like "sight word activities", and go from that. Keep it simple and searchable; keep the cutesy names for your cover image. 

The description should give an overview of your resource, what's included, and how it will make a teacher's life easier or address a classroom need. Work some keywords into the description naturally, especially in the first few lines. Do NOT keyword stuff, meaning, do not put a list of related keywords into your description. That can actually hurt you in the search results, as TPT says their algorithms penalize keyword stuffing by putting those listings further down in the list of results.

Along this same line, avoid adding to your title or description in the hopes of getting extra sales. For example, during the holiday season, don't just add the word "Christmas" to your titles and descriptions unless they are actually Christmas-specific products. It's a shady practice and buyers see through it, plus it muddies the search results for people actually searching for Christmas activities.

You will probably want to add your terms of use to your description so that buyers know any restrictions before they purchase.

Before you can list your product, you will also need to select keywords, product types, and grade levels from TPT's menus. This helps buyers to find relevant products.

This sounds like a lot to do for every product every time, doesn't it? Well, thankfully, I've got a trick to help make this process faster. Once you list that first product, you can use it as a starting point for future products. On the TPT site, click on your name, then "My Product Listings" in the drop-down menu. When your list of products comes up, you will see each one has an option underneath labeled "Quick Edit". Select that, and then scroll down to "Create a Similar Listing". This will essentially copy the listing, allowing you to change anything you need without having to retype all of the tedious parts each time. Just make sure you change all of the product files and thumbnails!

Once you have written your description and uploaded your product file, preview file, and cover and thumbnail images, YOU ARE FINISHED! Click that publish button and wait for sales to start coming in!

Congratulations on becoming a TPT Author! I wish you and your store all the greatest success!

Keep teaching (and creating) with heart and passion!

Sunday, June 6, 2021

Selling on TPT 101: Product Previews

Selling on TPT 101: Product Previews | Apples to Applique

Welcome to TPT 101: Part 9! (Click on these links to find Part 1, Part 2, Part 3, Part 4, Part 5, Part 6, Part 7, and Part 8).

You've made it to the final step before listing your product: creating a preview! A preview differs from thumbnails in that it gives buyers a more in-depth look at your product. 

Often, sellers choose to show their entire product in the preview; I typically do this for most of my resources unless the product is too large. This helps buyers know exactly what they are getting and prevents any surprises. I know I hesitate to purchase products for use in my own classroom if I can't see enough of it to know whether it will meet the needs of my students.

When sellers hear recommendations to show their entire product, they often get nervous about their work getting stolen. Why would people pay for something they can get for free? This is a valid concern, but there are steps to take to safeguard against this. First of all, watermark your products. I put "©Apples to Applique" multiple times across the page in large, semi-transparent text. If you're using AdobePro to flatten and secure your products, the watermark step is easily added into this process. AdobePro also gives the option to not allow printing, which is what I select for my previews. 

If you take those two steps, there is little reason to fear people will steal your resources. Most people are not going to take the time to copy your product when they can just spend a few dollars to purchase it. Not to mention it is difficult to replicate clip art, fonts, and design. 

Of course, there is always an exception or two. For example, I wouldn't recommend showing your entire resource if it is something like a reading passage that a buyer could conceivably use without having to print the product. Otherwise, show off your hard work! Resources with good previews generate more sales than resources without them.

We are almost to the end of TPT 101! Just one more post to come, all about finally listing that product!

Keep teaching (and creating) with heart and passion!


Friday, June 4, 2021

Selling on TPT 101: Making Catchy Covers and Using Thumbnails

Selling on TPT 101: Covers and Thumbnails | Apples to AppliqueWelcome to TPT 101: Part 8! We're getting ready to wrap up the series; only two more posts after this one. (Click on these links to find Part 1, Part 2, Part 3, Part 4, Part 5, Part 6, and Part 7). 
 
So, you've created your unique, quality product, made sure you followed copyright and trademark guidelines, flattened and secured your work--time to finally list it, right?!
 
Not quite yet, but you're getting close! Now you need to make covers and thumbnails for your product. 
 
Your cover is the image that will show up in search results and be prominent when someone clicks on your product. The thumbnails are the three other images buyers can click on when perusing your product.

Here's an example of a cover image from one of my latest products.


The space TPT gives you for covers and thumbnails is square, so I recommend making your images square, as well, to use all of the space and also give the impression you are familiar with the platform and care enough to make your products look neat. I create in PowerPoint and simply make my slide size square, add in my elements, then save the slides as JPG images. There are other programs you can use to create, too; many sellers like Canva. Anything that works for you and allows commercial use is fine.

When making your covers, don't try to show everything; that's what your preview is for (we'll talk about previews in Part 9). Just show enough to catch the eye and pique buyers' interest. There are millions of products on TPT, you want yours to stand out! Use big text and minimal information.

I have found that I have the best results when I use photographs (when possible), so I highly recommend it. Shots of your resource in action can help buyers visualize the product in their own classroom and showcase how awesome your resource is. However, when utilizing photos, do NOT show students or their work! (That's a huge FERPA violation, not to mention a poor ethical decision to use your time in the classroom to work on commercial endeavors. All TPT work should occur off the clock). Most in-action photos you see are staged, with sellers completing any "work" themselves. I've even been known to write with my left hand on a paper to make it look more childlike--whatever works! Sellers also frequently use their own children to stage photographs.

Thumbnails from the same product I showed above

After your cover, create your three thumbnails. These are your advertising space! Highlight what makes your product unique and valuable. Again, don't try to show everything! Just pick a few important things you want your buyers to know. The rest will be in your product description and preview.

Once you create your cover and thumbnails, you are only one step away from being able to list your product! Keep an aye out for TPT 101: Part 9, coming soon!

Keep teaching (and creating) with heart and passion!

Wednesday, June 2, 2021

School Year in Review: Faves and Flops

Note: This post contains affiliate links. If you make a purchase after clicking on my  links, I receive a small commission at no cost to you! Thanks for your support!

Classroom Faves and Flops | Apples to Applique

This abnormal school year is finally drawing to a close. Though it has been shorter in duration (we started a month later than usual, as did many other districts), it has felt longer with the extra strain of teaching during a pandemic. I was blessed to be fully in-person for most of the year, with the exception of the month between Thanksgiving and Christmas, during which we were remote, but that was not without its challenges. Keeping 6-year-olds distanced and wearing masks, making sure everyone was frequently washing hands, the revolving door of students in quarantine, the lack of in-person connection with parents, the absence of fun traditions like field trips, etc.--it has all taken its toll. As usual, I am sad to tell my students goodbye, but I am more than ready for a break.

Looking back on this crazy year, I thought it would be fun to highlight some of my favorite things, and some things I tried that didn't work out as well. Teaching is an art, and, as with any other art form, you are constantly learning and honing your skill.


Classroom Faves and Flops | Apples to Applique
 

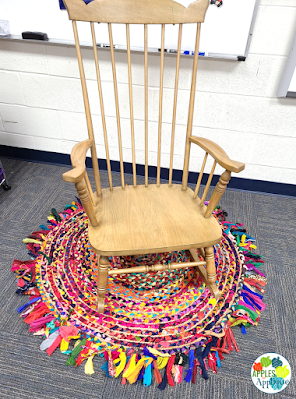
Fave: This adorable rug

My littles love to scooch close to me on the carpet and I am constantly afraid of rocking over their little fingers. I also am a person who gets overwhelmed by too much sensory input, like touching, and sometimes need some space from the little hands that want to constantly be patting or tugging at me. I realized that a rug would provide a perfect visual boundary, as well as being cute. It matches my colorful decor well and, being an inexpensive rag rug, I'm not too worried about it getting torn up. I love the happy pop of color it provides, and it has worked quite well to define my space for my students.

Classroom Faves and Flops | Apples to Applique
They do *not* still look this cute after a year of use!

Flop: Individual student lap desks

Oh, they looked so cute on Pinterest, and as we were being told we had to keep kids spaced apart all day, the collaborative tables I usually use were not an option. Individual desks were low in supply in my district, with everyone wanting them, and it didn't seem age appropriate to ask first graders to sit at them all day. This seemed like such a good option!

At first, I loved it, and my kids loved it. But as time went on, I realized the desks were a pain. They were so lightweight that they got kicked/knocked over easily, they moved about too freely on the carpet, and they became a catch-all for all the little things that 6-year-olds treasure (read: stuff that should be thrown away). They also were not as sturdy as I had hoped, and it didn't take long for many of them to crack. Surprisingly, many of my students started requesting to sit at the couple of traditional desks I had left in the room. As I had already suspected in years prior, the kids do better with occasional movement, and going from desk to floor sitting throughout the day provides that.

I'm looking forward to ditching the individual desks and returning to collaborative tables next year, but hey, I tried something new!


Classroom Faves and Flops | Apples to Applique

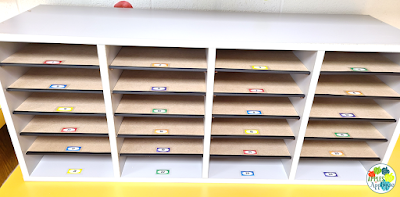
Fave: This student mailbox system

This helped so much with organization and made it possible for me to only send home papers once a week, as opposed to every day, without having them piled on my desk or having the kids shove them in their cubbies. It was a little pricey, but it was worth it to me to get the wooden version as opposed to the cardboard versions. It also took a bit of time to put together, but I am so glad I took that time.

Classroom Faves and Flops | Apples to Applique
 

Flop: Yoga mats for students 

These seemed like a great idea to accompany the lap desks. However, it didn't take long for little pieces of the foam to start flaking off. I even had a couple of students cut slits in the sides of them with safety scissors, so they just weren't durable enough for daily classroom use. They also became a tripping hazard, and cleaning and rolling them up each day became quite the chore. This flexible seating option gets a hard "no" from me.


Classroom Faves and Flops | Apples to Applique

Fave: This small group system

I love, love, love this thing! It makes it so easy to change groups around and to organize materials--provided they are worksheet-type activities. My only complaint is that it's not convenient to organize small group activities such as games, which I tend to utilize a lot in my classroom. On those days, I put a note in the file folder that lists/explains the day's activity and then put the activity materials in a color-coordinated tub. Problem solved! This system makes things really easy for subs, paras, and anyone else who may be coming in to work with small groups.


Classroom Faves and Flops | Apples to Applique

Flop: This headphones organizer

You guys, I really wanted to love this. It seemed like such a great organizational solution! I even created an editable headphones organizer that I listed in my TPT store. This may be fine for older grades, but most of my kids were too short to reach the top row or two. The bottom of the organizer was already at the floor, so I couldn't lower it anymore. The weight of all of the headphones (plus the kids yanking on it trying to get headphones out from higher rows) proved to be too much for the Command hooks holding it on the wall, too, so I was having to frequently rehang it. All in all, I decided it was easier for the kids to keep their headphones in the baskets in their cubbies.

Well, there's my list of faves and flops for the 2020-2021 school year. I would love to hear your own faves and flops!

Until next time, keep teaching with heart and passion!