This is my first-ever how-to post for TPT sellers! I still feel like such a newbie and a small seller that I'm a little intimidated to think that I have something to offer other sellers. However,
my little store is seeing growth and success, so I'm starting to realize that, while I am still small, I'm not a teeny-tiny seller any more, and that I have accumulated a lot of knowledge in my 3.5 years as a TPT seller that I can pass on.
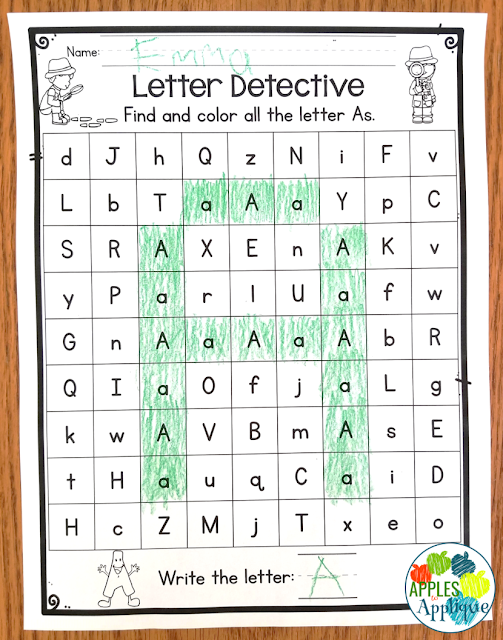
About a year and a half ago, I had seen some really cool videos of products, where a teacher could
type in a list of words, and the words--such as sight words or student
names--would auto-populate throughout the rest of the product, using the
perfect font, sizing, etc. It looked like magic, and I could not rest
until I learned how to do it!
When I was trying to learn, I could not find a detailed, step-by-step guide anywhere, so I'm trying to fill that void. It took me a LOT of searching and experimenting before I figured out how to do this. I thought maybe it was just me, and that everyone else knew how to do it, but I have since helped a few other sellers with this task, so I thought maybe this post might help someone.
To make an editable PDF that will auto-populate words from a list, you will need AdobePro.
When you create your product, in whatever program you are using, design your pages, leaving a space where you want your editable text to be.
For this first page, I want the students to trace their name, so I'm just going to leave some blank handwriting lines. After I save it as a PDF, I will add the text I want them to trace.
For this next page, I want it to say the student name at the top of the page, and then populate using a box font on the left-hand side, so I will leave both of those areas blank.
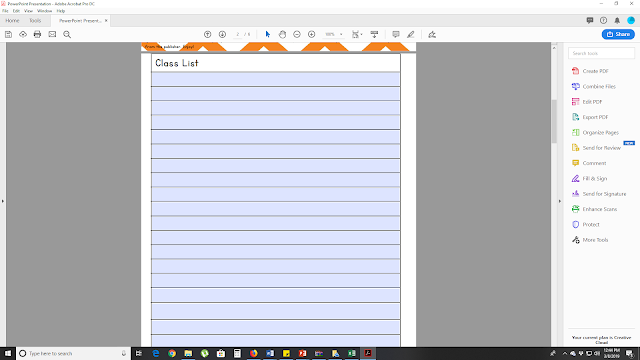
Before I save it as a PDF, I will add a page to the beginning (I usually have it right after my cover and credits pages) that has a blank table for the teacher to type their words in. This is where they would type in the words they want to use in the rest of the document, whether those are sight words, a class list, or whatever. Since I am making name sheets, I called mine "class list". This page doesn't need to be fancy. I like to use a table because it makes it easy for Adobe to see where I want to add my text boxes, without me having to manually add each one.
For this particular product, I wanted a teacher to be able to create a class set of name sheets for up to 25 students, so I put 25 lines in my table.
Since I want 25 copies of the same sheet, only with different kids'
names, I need to start off with 25 copies of each product page I make. So I have 25 of
the "My name is" sheet and 25 of the "I can trace my name" sheet. At
this point, they are all exactly the same, so just design one and copy/paste to get the number you need for your product.
When I have my product pages the way I want them, I save the document as a PDF and open it in Adobe. Then, I click on "Tools" --> "Prepare Form".
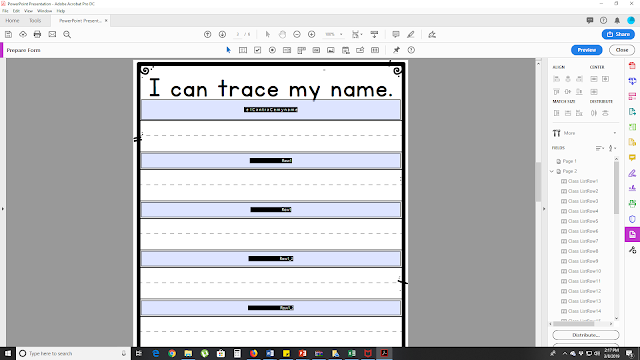
When I do this, Adobe puts text fields all the places it thinks I will want them. They show up as blue boxes with black text in the middle. This text is the name of each field, which we will be changing shortly. These field names are where the magic happens!
Look at the page where you made your blank table. Adobe will fill in the blanks on your table with text fields. Each one has a different name, just whatever Adobe thought was a good idea. On my example, they are called "Class List Row 1", "Class List Row 2", etc. You can leave this as they are, or change them to something easier for you to remember and work with. In a few minutes, you will be typing these names exactly as they appear here into other text fields in your document. You may want to change them to something simpler, like "Student 1", "Student 2", etc., or "Sight Word 1", and so on. To do this, just right-click on the text field and select "rename field".
Next, scroll down to the actual product pages in your document. Adobe will have guessed again at where you want text fields on those pages. Sometimes it's pretty close, like on this page...
Other times, it's way off-base, like on this page, where it tried to put the text fields between the handwriting lines.
It's no big deal, just move, resize, delete, and add text boxes as you wish, until they are where you want them.
At this point, the text fields
all have unique names. Now that you have all the fields sized and placed where you want, it's time to start renaming them.
For this product, since I put 25 rows on the Class List sheet, that turned into 25 text fields with different names. When you create a form in Adobe, every text field with the
same name will auto-fill with the same text you type in, so we are going to change the names of text fields wherever we want the same words to appear throughout the document. Remember on that first page where all my rows were called "Class List Row 1", "Class List Row 2", etc.? Whatever names I used for the text fields on that page, that's what I'm going to use now on all my other pages.
I will pull up the first "My name is" page. On this page, I want the student name to appear at the top and on the left-hand side, which is where I had previously put my text fields.
Now, I am going to rename those text fields. I am going to call
each of them "Class List Row 1". I right-click on the text field and select "rename field", then type in "Class List Row 1". I do this for
each text field on the page.
Then I pull up the "I can trace my name" sheet. I want the same student name to show up on every handwriting line on the page. So I rename
every text field on this page to "Class List Row 1".
Then I will repeat this process for all of the remaining pages. I pull up the next "My name is" sheet and change the name of
every text field to "Class List Row 2". I pull up the next "I can trace my name" sheet and change the name of
every text field to "Class List Row 2". This can be a tedious process when you are doing 25 pages at a time, but it saves your buyers so much time!
Once everything is renamed, anything you type into any field titled "Class List Row 1" will automatically show up in every other text field that has that same title. The words in any field with the same name will always be the same. But the cool part is, they can all be formatted differently!
So, using my example, I want a primary printing font at the top of the "My name is" sheet, a box font for students to fill in on the left-hand side of the "My name is" sheet, and a traceable font on the "I can trace my name" sheet.
First, I like to open up my original document in PowerPoint (or whatever program you use to create) and play with the fonts and sizing until I find what I like. As a word of caution, make sure that the font artist from whom you purchased the font allows for embedding fonts in their terms of use! Some font artists do not allow this.
Once you have decided on a font and figured out the size of font you need, go to one of your product pages (not the list page--the font on that one doesn't matter) and right-click on a text field. Select "Properties".
Next, select the "Appearance" tab. There, you can select a font and size. When you embed the font in this way, whatever font and size you select is what will show up for the buyer, even if they do not have that font installed on their computer!
There is a little drop-down menu for font sizes, with just a few options. If those options don't work for you, as they didn't for my product, you can click in the font size box and type in the size you need.
There are other tabs you can select, as well, such as the "Options" tab, which allows you to align the text to the left, right, or center.
Do this for each text field--again, it can be tedious, but the end result is awesome! This part takes some tinkering to get the exact sizing and placement right. When you are finished, you can select the little box at the bottom that says "locked" in the properties box and close the window. Don't do this until you have it exactly how you want it!
Once you have changed the properties in all of your text fields, you are good to go! You can still flatten and secure your file as always, to protect your work and the work of any clip artists you might have used; just make sure the security settings you select allow for typing into form fields.
When you save and reopen the file, you (and your buyer) will only see blue boxes, without any text.
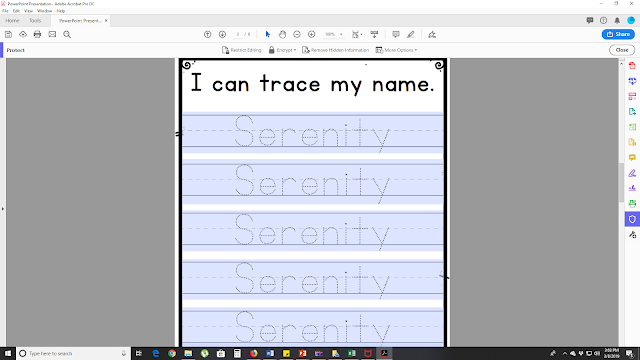
They will be able to type their desired words into that blank table on the first page...here I'll just type the name "Serenity" to show you what happens...
That name will auto-populate throughout the rest of the document, in every other text field that was named the same.
Here it shows up in the primary printing font and the box font...
And on this page, it shows up in the tracing font. All from just typing it in one time!
Learning this skill was a game-changer for me and my products! I hope you found this tutorial helpful. If anything was unclear, feel free to reach out to me with questions and I'll try to help!
Happy creating!


