We are in the middle of a unit on sky and weather. This unit was not initially not my favorite. It is so much easier to get Pre-K kids engaged in a unit on, say, wild animals. Something about animals that have ferocious teeth gets 4-year-olds excited. The more dangerous it is, the more they want to learn about it. It's a little hard to garner that same excitement when talking about clouds.
The last few years, I've been working on gathering some resources and adding some activities to flesh out our weather unit, and it's been going better.
Of course, we have a class meteorologist who checks the weather for us every day and reports back to the class. It's super cute, especially since one of my paras brought in a cheap pair of binoculars for the meteorologist to use to look out the window. The kids take jobs like that so seriously! They tell the class their findings and record it on a weather graph on the SmartBoard, or on our weather calendar. We also have some good books we read and songs we sing about weather and storms, but I've been working on finding activities to make it more hands-on.
One of my favorite activities in this unit is reading It Looked Like Spilt Milk by Charles G. Shaw, and then following it up with a sensory art activity.
 |
| Click on the image to purchase your own copy! |
It Looked Like Spilt Milk is a simple little book that shows different things clouds can look like. It doesn't reveal until the end that it's a cloud, so I like to ask the kids as we go along what they think it might be that could be all of those different shapes. It's fun to keep them guessing!
After we read the book, we do a sensory art activity. Just mix roughly equal parts shaving cream and white school glue, dab some on some paper, and let the kids go to town!
 |
| So much fun! If they don't flatten it too much, it will stay puffy when it dries. |
When they are finished, ask them what their cloud looks like. Sometimes this takes a little help, as lots of them will just say "a cloud". I put the book under the document camera and show them pictures again, and remind them it could look like anything, not just a picture from the book.
While our clouds were drying, we do a couple of science experiments to makes storms in a jar.
The one on the left is essentially a lava lamp. The picture just doesn't do it justice; in person it looks really cool as it all bubbles around. To make it, fill the jar about 1/3 full of water, then the rest of the way with oil. (Vegetable oil works great, and is cheaper, but for a more clear color, use baby oil). Drop in some food coloring. The kids like watching that part, as the food coloring travels through the oil and stays in droplets. Then, drop in an Alka Seltzer tablet and watch the magic really happen!
To make the rain cloud (on the right), fill the jar about 3/4 full of water. Add a shaving cream cloud on top, then liberally add food coloring. Talk to the kids about how clouds hold water until the water gets too heavy, at which point it comes down as rain. Depending on how thick your shaving cream is, and how much food coloring you use, it can take a few minutes for your food coloring "rain" to work its way through the cloud. If none of it makes it through to the water after a few minutes, add some more, in the same spot you put the drops the first time.
My students started asking what would happen if we added Alka Seltzer to the rain cloud, so, in the interest of investigative science, we tried it. The kids loved watching everything bubble! It didn't look so much like rain any more at that point, but they didn't care!
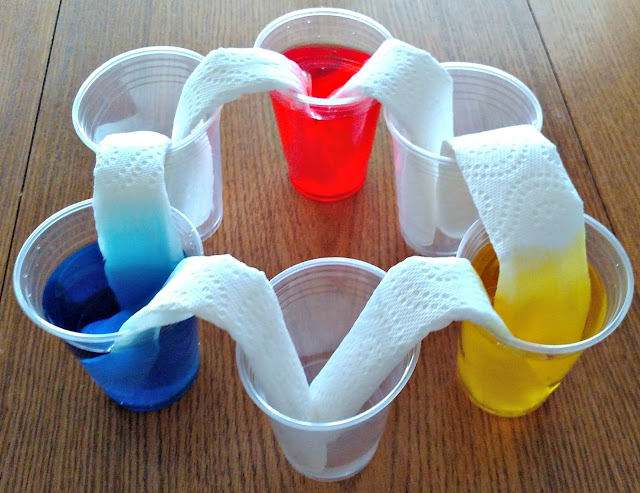
A third science experiment we like to do in this unit is the traveling rainbow. This idea has been floating all over Pinterest, but I was afraid it wouldn't work as well as the pictures made it appear.
Let me assure you, though, that it does work! It's one of the favorite experiments we do all year, and one of the easiest! It does take some time to work its magic, though, so start it early in the day so the kids can observe it for a couple of hours.
Start with 6 clear cups, 3 empty and 3 full of water. I discovered through trial and error that it works best if the cups are all the way full. Use food coloring to color the three cups of water red, yellow, and blue. Arrange the cups in a circle, with every other cup being empty.
Roll up some paper towels, and run them like a bridge between each full and empty cup. Each cup should have two paper towels going into it. This is a great point to ask kids for predictions about what they think will happen.
The water will begin to creep up the paper towels, and will eventually drip into the empty cups. After a couple of hours, you will have a completed rainbow!
Pretty cool, huh?
So there you have it, three science experiments and one sensory art project that have really enhanced our sky and weather unit. I would love to hear about other activities you use to get your kids excited about sky and weather!


No comments:
Post a Comment